Shared Access
Shared Access lets you give other people permission to view and/or access to your account. You can control exactly what type of access you share by choosing certain from certain permissions. For example, you can choose to only allow a person to view the account, or you can allow them to make certain transactions. This is a good way to let a joint member, financial advisor, accountant or other designated person view your account using their own unique login credentials.
How to Set Up Shared Access
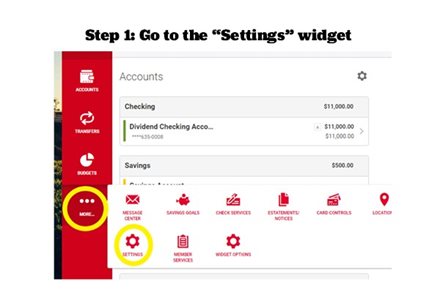
- Login to your Online Banking profile, and click the “MORE…” selection. Then click on the “SETTINGS” option.
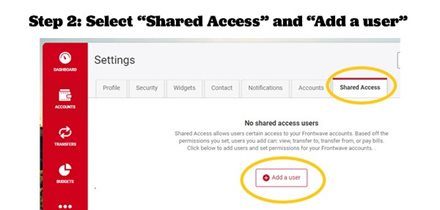
- On the “SETTINGS” page, click on the “Shared Access” tab at the top, then click “Add a user.”
- On the “Add user” page, enter all of the requested information for the person you want to give access to your account. You’ll need to enter the person’s First Name, Last Name and Email Address. You’ll also need to enter the person’s email address a second time in the Confirm Email Address field.
- Under “Choose permissions,” select the accounts (shares) and level of access you want the person to have. Options include “View account” (see balances and transactions), “Transfer into” (add money from another account to the selected account), “Transfer from” (move money from the selected account to another account), and “Pay bills.”
If you want the person to have full access (able to do everything you can do as the primary account holder), click “All permissions.” Once finished, scroll to the bottom of the page and hit “Save.” - Once you click “Save,” a new window will pop up asking you to confirm and invite the added user. Review the permissions to make sure they are correct and then check the box next to the statement “I acknowledge one or more of these settings selected will allow the invitee to transfer money from my account/accounts.” Note that this “acknowledgment” disclosure will appear regardless of whether or not you elected to give the person permission to transfer money from your account. Once finished, click “Confirm.”
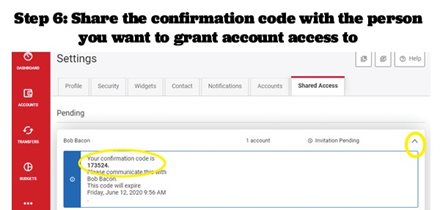
- After clicking “Confirm,” you’ll be brought back to the main Shared Access page. You’ll see an “Invitation Pending” notice at the top of the screen. Click on the pending invite to open it up. You will see a 6-digit confirmation code at the top. You must provide this number to the person you have given account access to. They will need the confirmation code to complete their registration (see step 8). Keep in mind the code is only good for 24 hours, so the person must accept their invite and complete the registration process within that time frame.
- If you need to make any changes to access you have granted, you can also click on the pending invite and choose from “Edit user” (to change their name or email address), “Edit Account Access” (to change access permissions) or “Cancel Invitation” (to delete the shared access for this person).
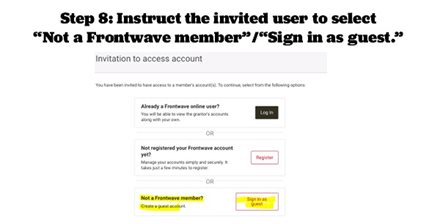
- When the person you gave access receives the email invite, instruct them to click on the unique link. From there, they’ll be directed to a page with 3 options: “Log In” with the existing Frontwave login info, “Register” for a login or “Sign in as guest.” The person MUST select “Not a Frontwave member”/“Sign in as guest.” This is true even if they are already a Frontwave member and/or a joint account owner. If the wrong selection is used, it may cause delays in setting up the Shared Access.
- A registration disclosure will pop up on the next page. The person should read it, check the box next to “I Agree,” and click “Continue.”
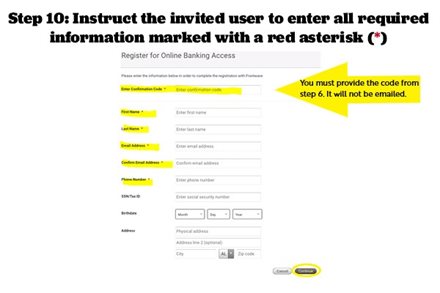
- On the next page, the person will be prompted to enter a confirmation code. This is the 6-digit code described in step 7 above, viewable from the “Shared Access” tab in your Online Banking account. You must give this code to the person you are granting access to. It will not be e-mailed to them.
In addition to entering the confirmation code, the person will need to fill in all the fields marked with the red asterisk, then click the “Continue” button at the bottom of the page. The system will then guide them through the rest of the registration process, which includes setting up a username and password which they will use to login and view your account.
Frequently Asked Questions
This is a general acknowledgement that must be marked for all Shared Access users. Basically, it’s a quirk in the system. But rest assured, if you didn’t select transfer access on the permissions page, the person will not be able to complete transfers.
Download the Frontwave mobile app to your Apple or Android device today.