Bill Pay
This feature saves you time and money by allowing you to set up online payments for any bills you may have. You can make a one-time payment, or use recurring payments for regular bills so you can set it and forget it – and never have to worry about missing a payment again.
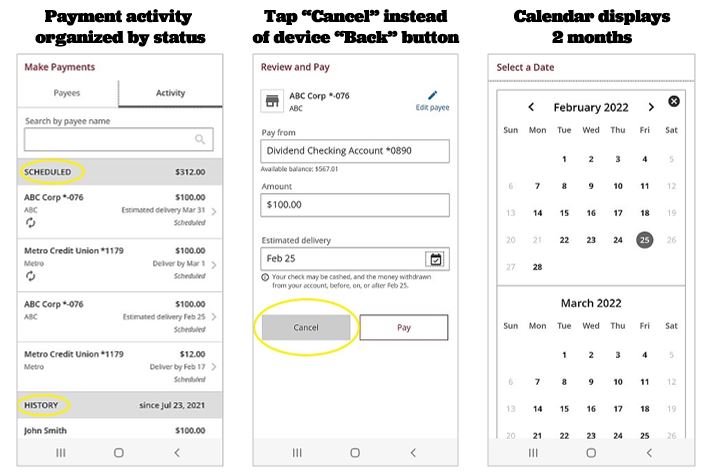
Update 1/23/22: New Mobile Bill Pay Experience
The Bill Pay mobile update is here! While the features have not changed, this update will provide members with an enhanced user experience on mobile devices. Updates include:
- Addition of "Cancel" buttons for easier “back” navigation
- Expansion of the calendar view for scheduling payments from one month to two months
- Bill Pay activity list will be organized by status: processing, scheduled, history
- Streamlined Autopay set-up process
- Improved payment-entry process for mobile app users
Getting Started – How to Pay Your First Bill
Never used our Bill Pay service before? Follow these instructions (trust us, after you do it once, it’s easy!):
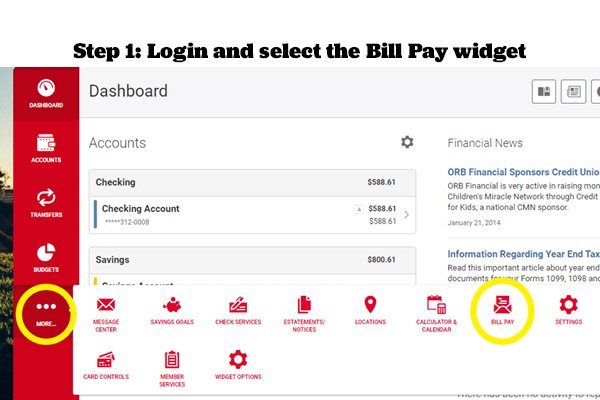
- Login to your Online Banking profile, and click on “Bill Pay.” This will either be on the main dashboard or under the “MORE” tab. On the next screen, read the Online Banking Access Agreement and Disclosure. Then check the box next to “I agree” and click “Continue” to accept.
- After you click “Bill Pay,” a new window will open asking you to “Launch Bill Pay.” Click on the button, then read and agree to the Terms of Service that pops up. This will redirect you to the Bill Pay website. Note that you need to have any pop-up blockers turned off. If they are on, you won’t get redirected to the Bill Pay website.
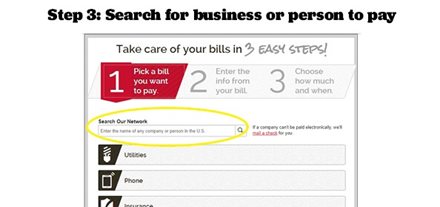
- Once on the Bill Pay website, you will be prompted to “Take care of your bills in 3 easy steps.” This screen will only appear the first time you login to Bill Pay. To get started, you will need “Pick a bill you want to pay.” This can be any businesses or person you plan on making a payment to. Simply enter their name into the search bar.
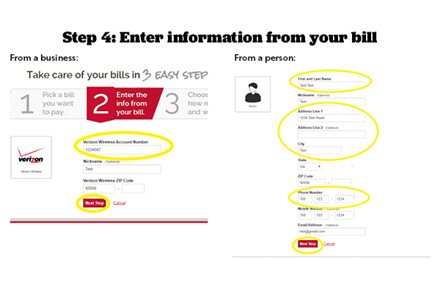
- Once you find the business or person you want to pay, a new screen will appear asking you to “Enter the info from your bill.” If you’re paying a business, this will include information such as your account number. If you’re paying a person, it will include details about him or her, such as first and last name, address and phone number. Fill in the requested information, then click “Next Step.”
- On the next screen, you’ll be asked to “Choose how much and when.” Enter the amount you want to pay and the date you wish to make the payment. Click on “Make Payment” to set the payment up, or click “Finish Later” if you’d prefer to return and set it up later.
- After entering your first bill, you will be redirected back to the start of the “Take care of your bills in 3 easy steps” process. Repeat the steps to continue adding additional bill payments. If you don’t want to enter any more bills at this time, click on the “Return to Payment Center” button.
How to Set Up a Payment (repeat user)
If you’ve already paid a bill through Bill Pay in the past, the process of setting up more payments is a little different, but just as easy!
To pay a company or person you have already set up in Bill Pay:
- ogin to your Online Banking profile, and click on “Bill Pay.” This will either be on the main dashboard or under the “MORE” tab.
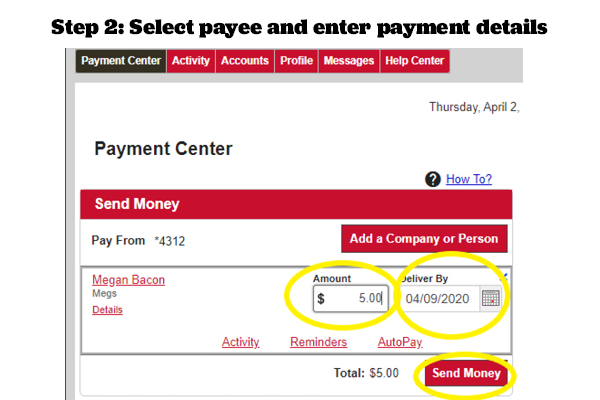
- From the “Payment Center” page, scroll to the name of the company or person you want to pay, and fill in the payment “Amount” next to their name. Then select the “Deliver By” date and click “Send.”
To add a new company or person to Bill Pay:
- Login to your Online Banking profile, and click on “Bill Pay.” This will either be on the main dashboard or under the “MORE” tab.
- From the “Payment Center” page, click on “Add a Company or Person.”
- In the new window that opens, enter the name of the company or person you want to pay in the search bar at the top of the page and press enter.
- Select the correct company or person from the results, then enter the requested account and/or payment address information on the next page. If no results are found, click “Other company” or “Person” to enter the details manually. When finished, click “Add.”
- On the confirmation screen, click “Return to Payment Center” to continue scheduling your payment.
- From the “Payment Center” dashboard, scroll to the name of the company or person you just added, and fill in the payment “Amount” next to their name. Then select the “Deliver By” date and click “Send.”
How to Set Up Automatic Payments
To set up ongoing payments (for example, to pay your daycare provider each week or your car loan every month):
- Login to your Online Banking profile, and click on “Bill Pay.” This will either be on the main dashboard or under the “MORE” tab.
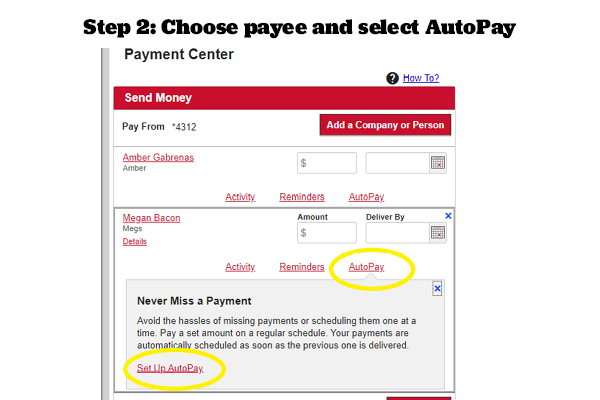
- On the “Payment Center” page, scroll to the person or company you want to pay and click on “AutoPay” next to their name. In the pop-down message, click on “Set Up AutoPay.”
- On the next screen, fill in the recurring “Amount” you wish to pay the person or company, select the “First Delivery Date,” the “Frequency” (how often the payment should be made) and the “Duration” (how long you want to keep making payments for). If you want to receive an email when a payment is pending or sent, click the appropriate box. Then click “Start Sending Payments” to complete the process.
How to View Bill Pay Activity
- Login to your Online Banking profile, and click on “Bill Pay”.
- From the dashboard, click on the “Activity” tab. Here you will see a list of any reminders you have set up, as well as a list of payments made within the last 30 days.
- To search for payments older than 30 days, click on the “Date Range” drop-down and select your preferred timeline. If you click on “Specific date range,” you can search for payments as far back as 84 months.
- To view payments by recipient name, category, status, or account, click on “Filter By” and select from the drop-down list.
How to View Accounts Eligible for Bill Pay
- Login to your Online Banking profile, and click on “Bill Pay”.
- From the dashboard, click on the “Accounts” tab. This will show you a list of all of your Frontwave accounts you can use for Bill Pay.
How to Choose Your Default Payment Account
If you have more than one Frontwave checking account, you can choose which one to use as your default payment account.
- Login to your Online Banking profile, and click on “Bill Pay”.
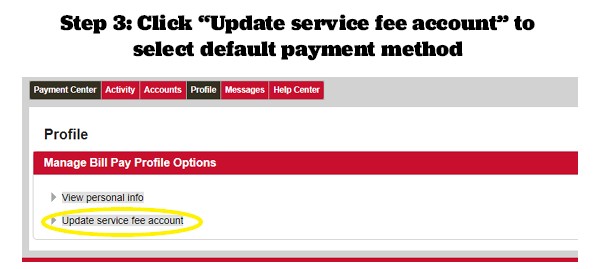
- From the dashboard, click on the “Profile” tab.
- Click on “Update service fee account” and select which checking account you want to use as your primary Bill Pay account.
How to Send a Secure Message
If you have a question about a service fee or want to inquire about the status of a payment or eBill:
- Login to your Online Banking profile, and click on “Bill Pay”.
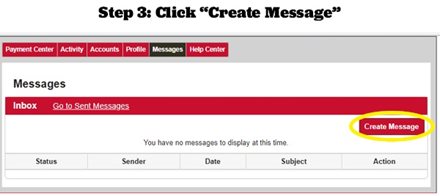
- From the dashboard, click on the “Messages” tab.
- Click “Create Message.”
- Choose the “Reason” for your message from the drop-down list, enter a Subject and type your Message. Then hit “Send.”
Frequently Asked Questions
Not a problem. Simply reach out to our Member Solution Center via:
- Phone: 800.736.4500
- Email: cservice@frontwavecu.com
- Secure Message within Digital Banking
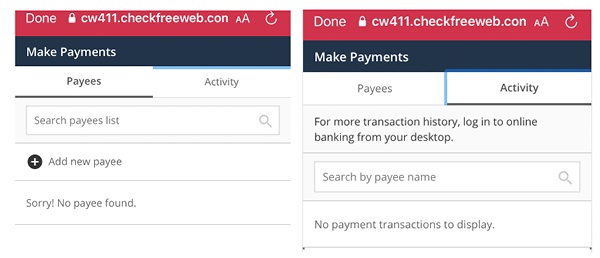
This is what Bill Pay looks like through the mobile view. It’s a little different from the desktop version, but it generally works the same way as described above.
There is a “Help Center” within Bill Pay that has lots of answers to frequently asked questions about using the service, including setting up payments, signing up for eBills and adding reminders. To check out this helpful content, simply login to Online Banking, click on “Bill Pay” and then select the “Help Center” tab at the top.
You’re also always welcome to send us a secure message through Online Banking, or give us a call at 800.736.4500.
Download the Frontwave mobile app to your Apple or Android device today.